Each time you launch Photoshop or ImageReady, the toolbox appears on the screen, usually in the upper-left corner. In the process of editing an image, you will go to the toolbox frequently to select various selection, painting, and specialty tools. This task outlines what you'll find in the toolbox and how to access it.
1. Open the Photoshop Toolbox
The toolbox should appear automatically on the desktop, but it can be closed, which means you have to reopen it. To open the toolbox, select Window, Tools.
2. Select a Photoshop Tool
Click a tool to select it. If the tool button contains a small triangle in the lower-right corner, that tool offers additional tool options in a pop-out menu. Click and hold the tool button to view the pop-out menu; drag through the pop-out menu to select one of the additional tools.
3. Open the ImageReady Toolbox
The ImageReady toolbox should appear on the desktop as soon as ImageReady opens. Like its Photoshop counterpart, the ImageReady toolbox also can be closed, requiring you to reopen it. To open the toolbox in ImageReady, select Window, Tools.
4. Select an ImageReady Tool
Click a tool to select it. If the tool button contains a small triangle in the lower-right corner, that tool offers additional tool options in a pop-out menu. Click and hold the tool button to view the pop-out menu; drag through the pop-out menu to select one of the additional tools.
5. Jump Between ImageReady and Photoshop
Click the Edit in button at the bottom of either the Photoshop or the ImageReady toolbox to move between Photoshop and ImageReady. This technique is especially useful when you have a file open and want to use features from both applications. You can also perform this command from a menu by selecting File, Edit in Photoshop/ImageReady or by pressing Ctrl+Shift+M (Windows) or -Shift-M (Mac).
Wednesday, December 13, 2006
How to Use the Toolbox
Welcome to Photoshop, Bridge, Camera Raw, and ImageReady
This task is a basic introduction to Photoshop, ImageReady, Camera Raw, and Bridge. In this task, you launch each program and evaluate the general workspace.
1. Launch Photoshop
In Windows, click the Start button and select All Programs, Adobe Photoshop CS2. On a Mac, open the folder labeled Adobe Photoshop CS2 and double-click the Adobe Photoshop CS2 icon. Click items on the Welcome Screen to gain easy access to tutorials and documentation of new features; click the Close button to launch Photoshop's main screen areas.
2. The Basic Photoshop Screen Areas
After closing the Welcome Screen, you'll see the full range of Photoshop controls. The toolbox is on the left side of the screen and contains all the Photoshop tools. The most commonly used Photoshop palettes appear on the right, and the menu bar appears across the top of the screen. The Options bar runs under the menu bar and contains the modifiers for each tool you select, the Go to Bridge button, and the Palette Well.

3. Launch ImageReady
In Windows, click the Start button and select Programs, Adobe ImageReady CS2. On a Mac, open the folder labeled Adobe Photoshop CS2 and double-click the Adobe ImageReady CS2 icon. The ImageReady desktop looks very similar to the Photoshop desktop. Closer examination, however, reveals that some of the tool icons and palettes are different and that the Slice, Table, and Image Map palettes appear in the lower-right corner of the screen.
4. The Basic Bridge Screen Areas
In Windows, click the Start button and select Programs, Adobe Bridge. On a Mac, open the Adobe Bridge folder and double-click the Bridge icon. If Photoshop is already open, click the Go to Bridge button located on the Options bar. Along the top are the menu commands. The large content area contains thumbnails of the images in the current folder; at the very bottom are the status information and display buttons.
5. The Basic Camera Raw Screen Areas
Camera Raw isn't a standalone application, but whenever you open a Raw file in Photoshop or Bridge, you are presented with the Camera Raw interface. The title shows some basic file information. Below that are the tools, view options, and RGB values display. To the right of the image area are the Histogram display and adjustment sliders. Under the image area are the Zoom controls and Workflow options. At the bottom right are buttons for Save (saves the adjusted image as a file), Open (opens the adjusted image in Photoshop), Done (saves just the adjustments), and Cancel (discards any changes and closes Camera Raw).
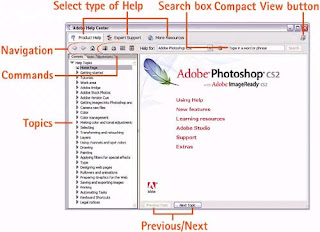
6. Adobe Help Center Screen Areas
The Help command in all CS2 applications now launches the Adobe Help Center. Beneath the top row of buttons are the Navigation and Commands buttons, along with the Search box. On the left side are the Help Topics titles, and along the bottom are the Previous Topic and Next Topic buttons
